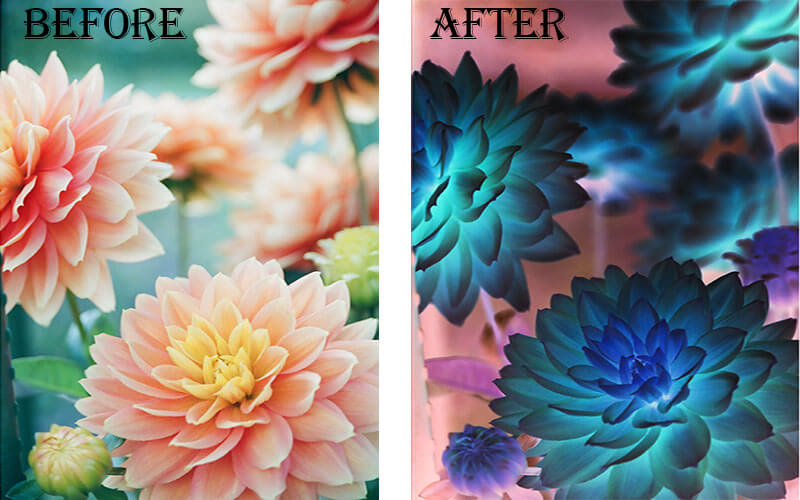
Photoshop has its big world, and you have millions of options to edit photos. Here, playing with the color of a picture is one of the fascinating parts. And the inverting color of an image sounds more fun. So, this content will tell you everything about how to invert colors in Photoshop.
Inverting color is not like changing the color of an object in a photo. There are multiple methods to invert color in PS. But we prefer the easiest one that is flawless and easy to remember. However, let us share some info about this color inversion first. Clipping Partner India, an outsourcing photoshop clipping path company.
Table of Contents
What Is the Process to Invert Color in Photoshop?
Yes, before you learn anything about color inversion in Photoshop, it is essential to know this process. Well, it is everything about taking out the original color of an object in a photo of just the entire image and then applying the exact opposite color to that.
The color is chosen from the CMYK and the RGB color wheel. For example, the magenta color is the exact opposite of the vivid green color. So, if you use this color inversion process, a field of vividly green color will become magenta.
As magenta comes in the exact opposite place of the vivid green color on the color plate, the greenfield will be magenta.
Difference Between Color Change and Invert Color
For sure, color inversion is not anything similar to changing the color of a photo. This process doesn’t let you choose the color anyway. Indeed, it selects the opposite color of the original photo color and applies that.
On the contrary, changing the color of a photo lets you choose the color and apply it to the image. It is common and used widely for various purposes. But the color inversion process is pretty much an uncommon editing function.
Why Do We Need to Invert Color in Photoshop?
The entire process of color inversion may seem funny, but it is pretty much weird. Indeed, it sometimes makes the photo uglier and of course, unrealistic. Still, people need to use this function for different reasons.
Basically, astronauts use this color inversion function to examine photos of space. Besides, different nuclear projects use this function for their tasks as well. Detectives and other professionals also use it to spot some smaller objects in a photo.
Different clipping path services also need to use this function as well. So, you need to learn the process if you are engaged with any of these professions. We must say that the entire process is straightforward. So, why don’t you know about it just for self-satisfaction?
Learn More Tutorial: How To Make A White Background Transparent In Photoshop With 3 Easy Way
How to Invert Color in Photoshop: Step by Step Instructions
Let’s not talk more and just head towards the easy steps to invert color in Photoshop.
Step 1: Open the Image
You have to create an inverted layer of the target image. First, you need to open the desired image file in Photoshop. Make sure the photo is of high quality. Press the open tab from the file section, then select the image.
The most dramatic change is achieved through a photo with potentially dark or light complexity. It would be best to make a presumption within your mind whether the picture would be more or less effective after it is inverted.
Step 2: Manage the Layer Panel
You have to open the ‘Window’ menu and choose ‘Layers’ to access the photo layers panel. The change of colors is not made on the original image. This process will create an inverted color layer on the original image.
You can use selection tools like Lasso, Magical Wand, Marquee to mark the part you want to invert. If you need to invert the color of the whole image, then you don’t have to choose any selection tools.
If the image is complex in composition, you should add a layer. There is a quick shortcut for that, and it requires pressing the Shift+Ctrl+E button. This will create a merged composition of the work without changing other layers.
Step 3: Invert It
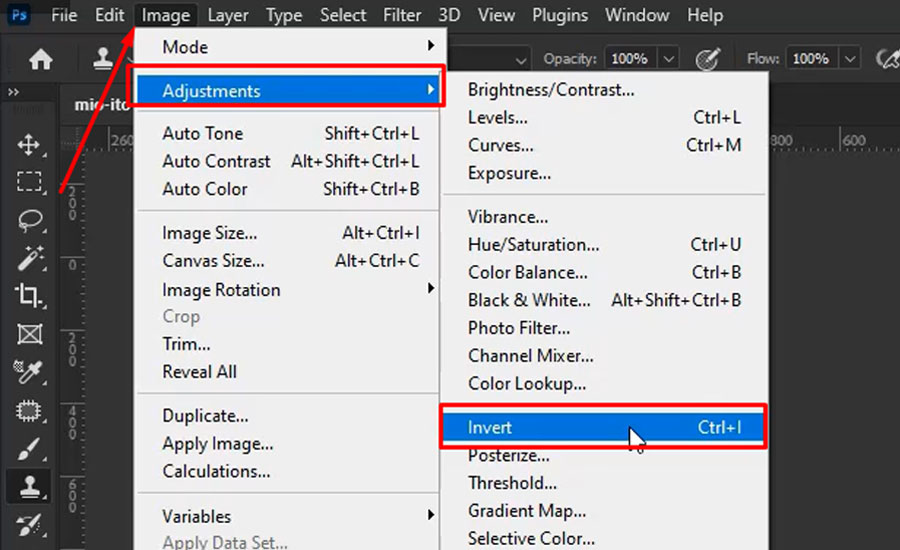
Now it’s time to invert the image. First, click on the ‘Create New Fill or Adjustment Layer’ button on the layer panel. Then choose the ‘Invert’ option from the appeared drop-down menu. Here Photoshop integrates an “Invert Adjustment” layer on the active layer in the adjustment session.
The process can be done on the immediate top layer from the layer stack. If any selection were made before adding any adjustment, the software would make a layer mask for the target layer. This time it will only invert the colors of the selected areas instead of the whole image.
Step 4: Compose the Inverted Layer
Now it’s up to you whether you want to drag the Invert layer up or down the stack for repositioning. The given layer’s condition depends on the immediate layers under it. So, the overall output depends on the inversion’s position in the layer stack.
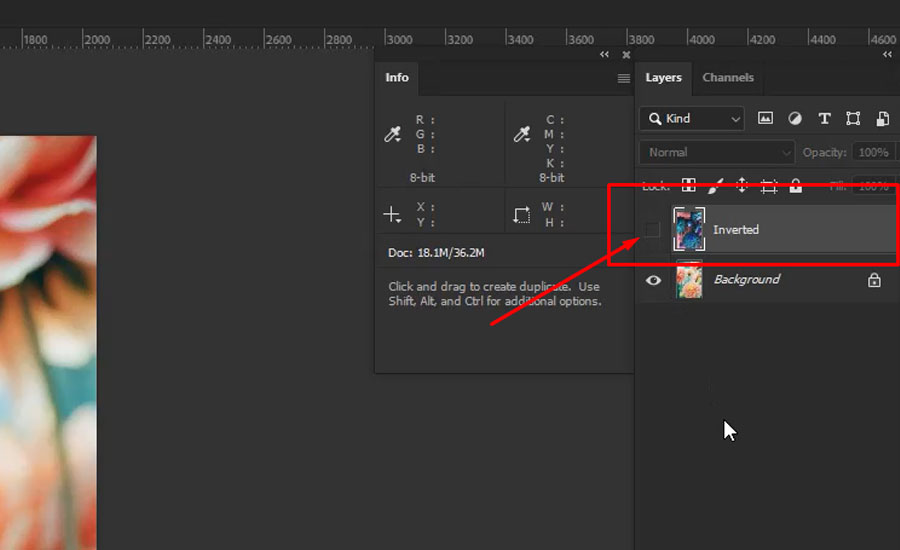
So, work here extra carefully to reach the desired outcome. In the next section, some work on the layer mask is required for color adjustments. If you wish, you can turn on/off the inverted layer.
Step 5: Apply the Arrangement of the Inverted Layer
Here, you will disable the mask and apply the adjustments to the whole file. For that, you should Shift-click on the layer mask with the Invert adjustment layer and disable the mask. Then click on the layer mask icon.
After that, switch off the eyeball indicator at the left side of the Invert layer listing. This will turn off the adjustment on its own.
Step 6: Create a New Snapshot
In this phase, you should work on both the inverted image and the original one simultaneously. You can also check if any further work needs to be done or not. Just after getting the inverted image, click on – Create New Snapshot.
Now can view both original and inverted images side by side. You should be able to keep the images in separate tabs. It provides quite a convenient editing and quality checking environment.
To Wrap Up
So, that’s it. Won’t you agree that the process of how to invert colors in Photoshop is easy? You must agree. However, if you have learned it properly, just give it a try and share your creation with us. We will wait for your response. Thank you for your time. And Learn More: How To Change Color Of Shirt In Photoshop.


